n8n video guide
Connect n8n to a crypto payment gateway
Create crypto invoices from any n8n workflow and run your own steps when a payment is confirmed. Watch the whole setup in under three minutes, then follow the six steps. Customers pay straight to your own wallet.
In n8n: Settings › Community Nodes › Install, then enter
n8n-nodes-arionpayWatch it work
n8n and ArionPay, from install to a paid order
Install the node, connect your keys, receive a signed payment update, and watch a forged one get refused. Pick a chapter to jump to it.
One take on a self-hosted n8n 1.123.96 with a local ArionPay test server, in test mode: no real money. No sound; the captions are in the picture, and every step is written out below.
Before you start
What you need
- An ArionPay account: sign-up needs only an email address. Create one free.
- A self-hosted n8n that allows community nodes. Tested on n8n 1.123.96 (Node.js 22), not yet on n8n 2.x.
- Your API key, API secret and webhook signing secret, from the ArionPay dashboard.
- For real payments, your own wallet connected in the dashboard. Test invoices need no real money.
Step by step
Connect n8n to ArionPay in six steps
- 1
Install the node
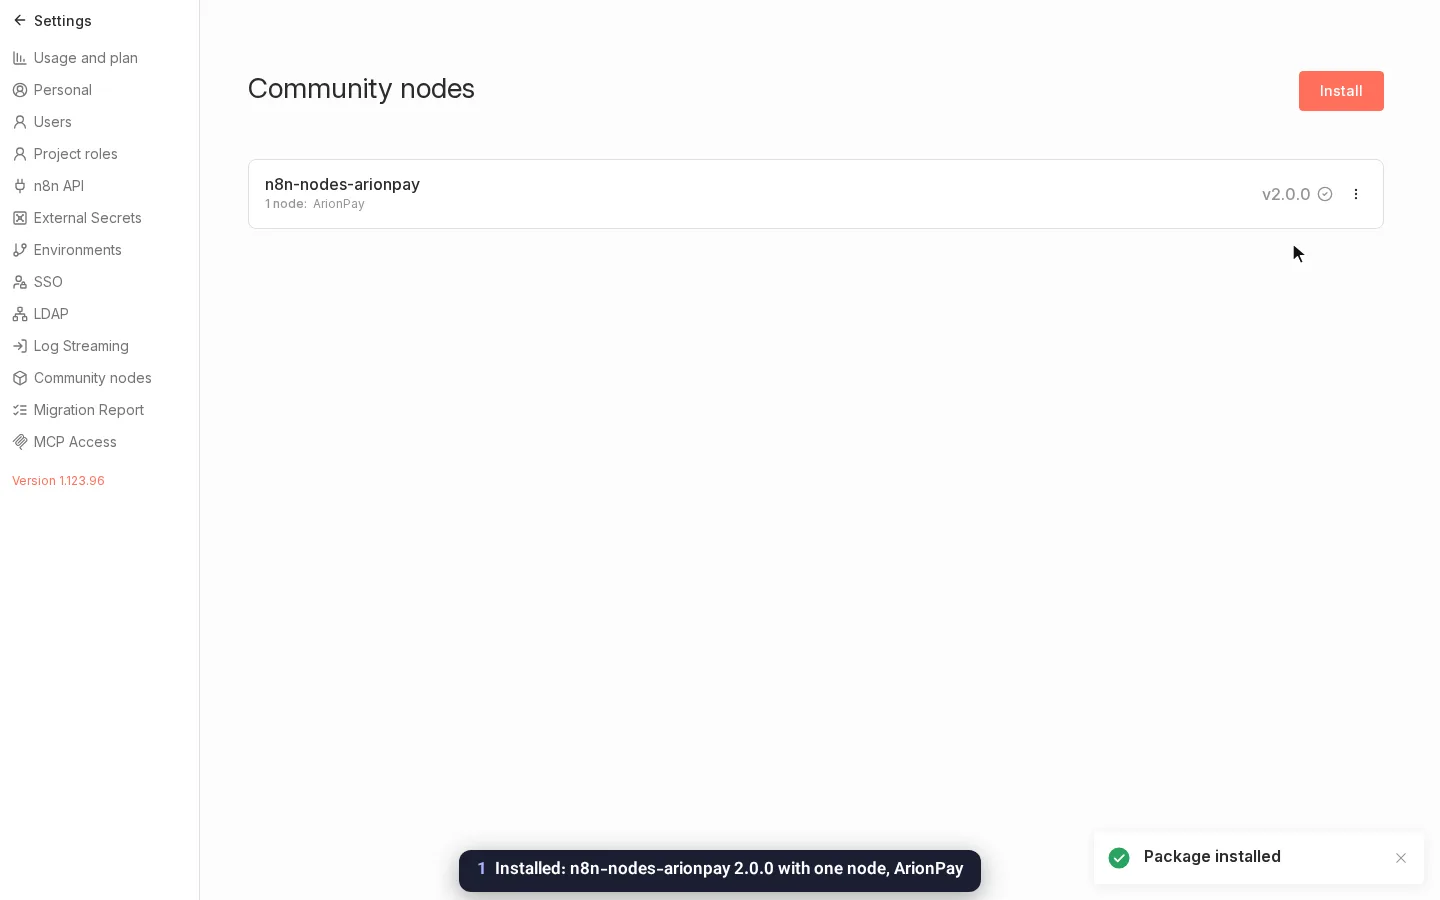
In n8n, open Settings › Community nodes and click Install. Enter n8n-nodes-arionpay, confirm the notice about community code, and install.
n8n downloads the package from npm and adds one node: ArionPay. The package has no other dependencies.
- 2
Add your API credentials
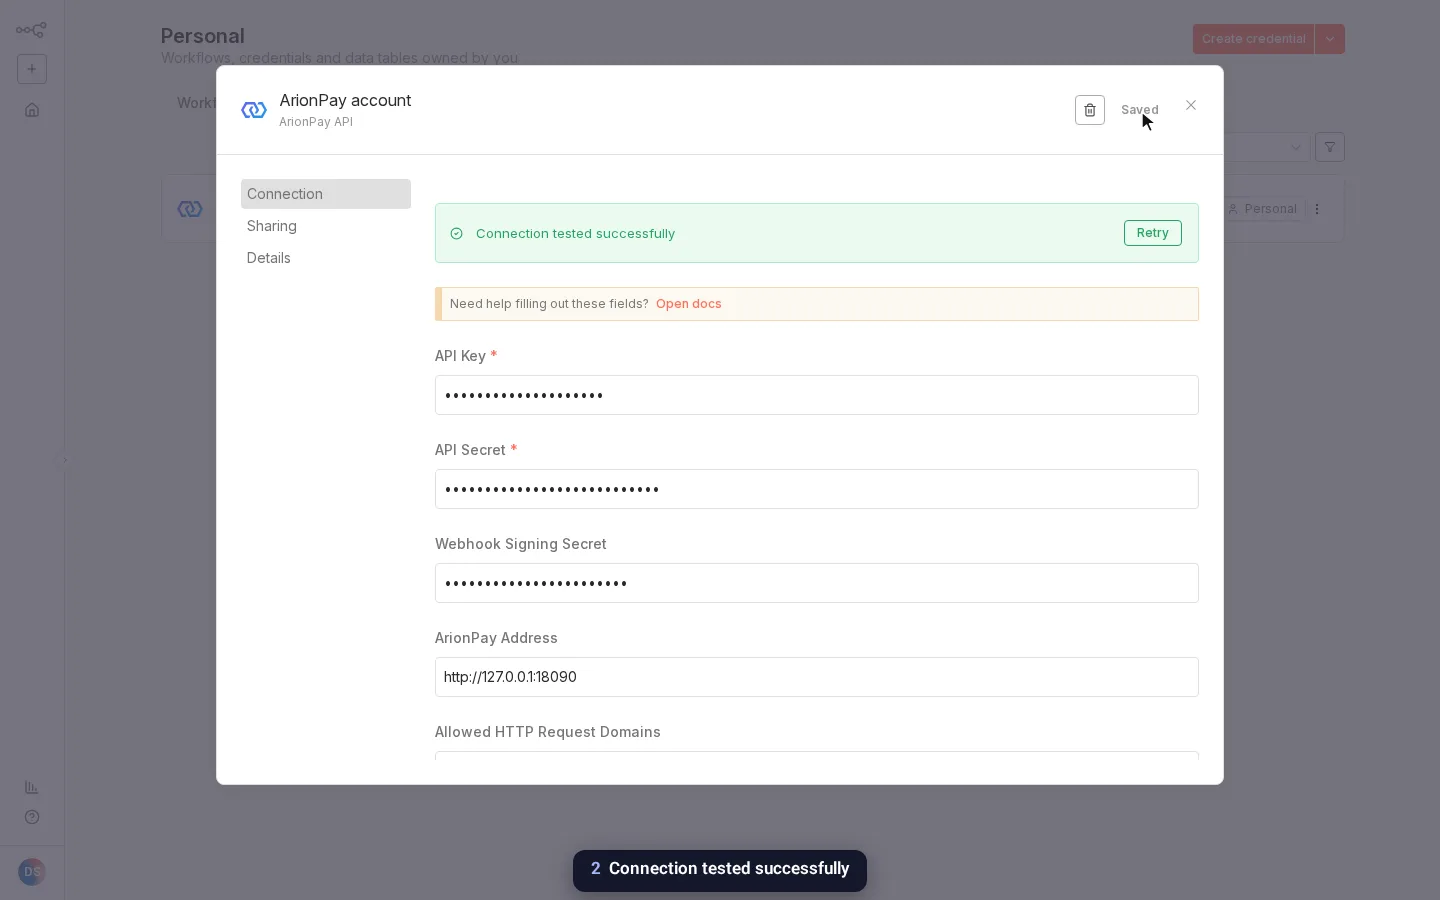
Create a credential of the type ArionPay API and paste the API key, the API secret and the webhook signing secret from your ArionPay dashboard. Leave ArionPay Address as it is: https://merchant.arionpay.com.
When you save, n8n tests the keys with one signed request that changes nothing. In the video a wrong secret is refused first, then the right one shows "Connection tested successfully".
- 3
Build the workflow that receives payments
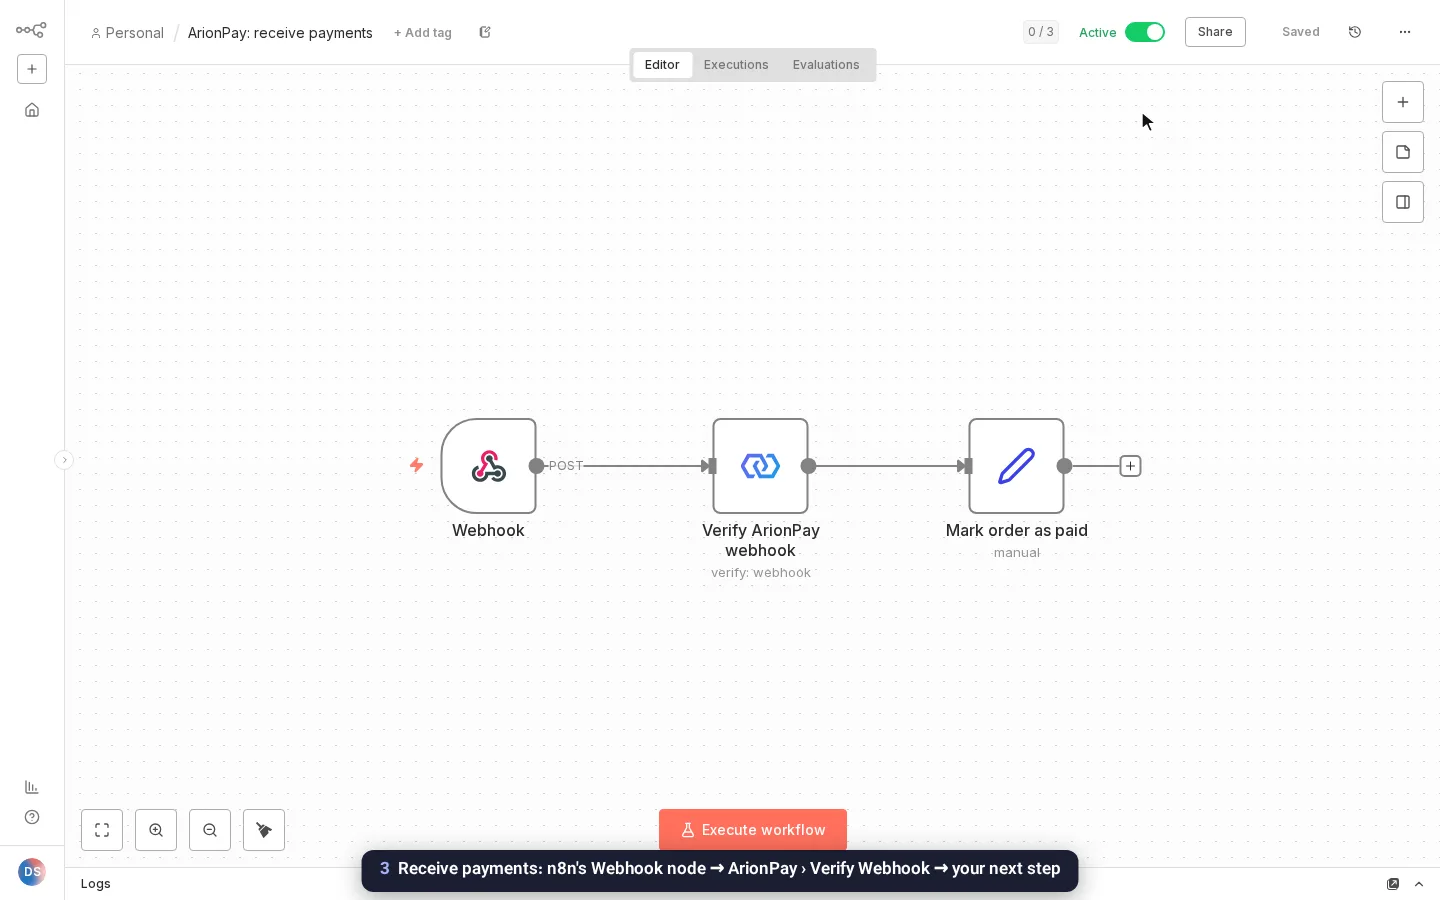
Add n8n’s own Webhook node: HTTP Method POST, Respond "When Last Node Finishes", Response Data "No Response Body", and under Options add Raw Body and switch it on.
After it, add ArionPay › Webhook › Verify Webhook and pick the events you want (Invoice Paid by default). Then add your own steps: send the file, give access, or mark the order paid.
Activate the workflow and copy the Webhook node’s Production URL to the Webhooks page of your ArionPay dashboard, or send it as Callback URL with each invoice.
- 4
Create a test invoice and pay it
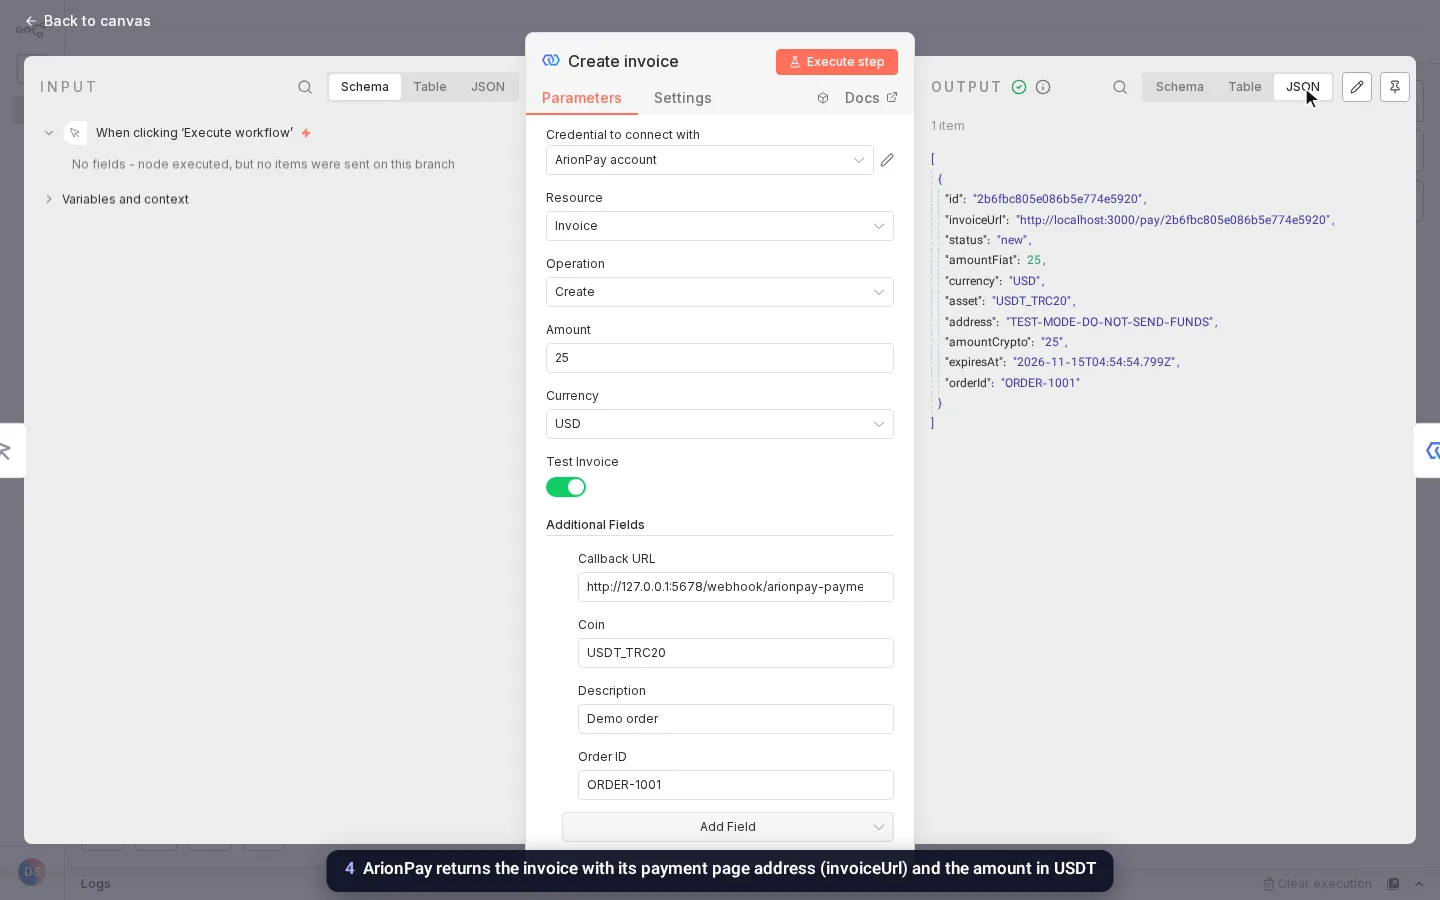
In any workflow, ArionPay › Invoice › Create makes an invoice: the amount and currency, Test Invoice on, and under Additional Fields the coin, your order ID and the callback URL.
ArionPay answers with the invoice, including its payment page (invoiceUrl): that is where you send your customer. In test mode, ArionPay › Invoice › Simulate Test Payment pays it with pretend money.
- 5
The paid webhook arrives
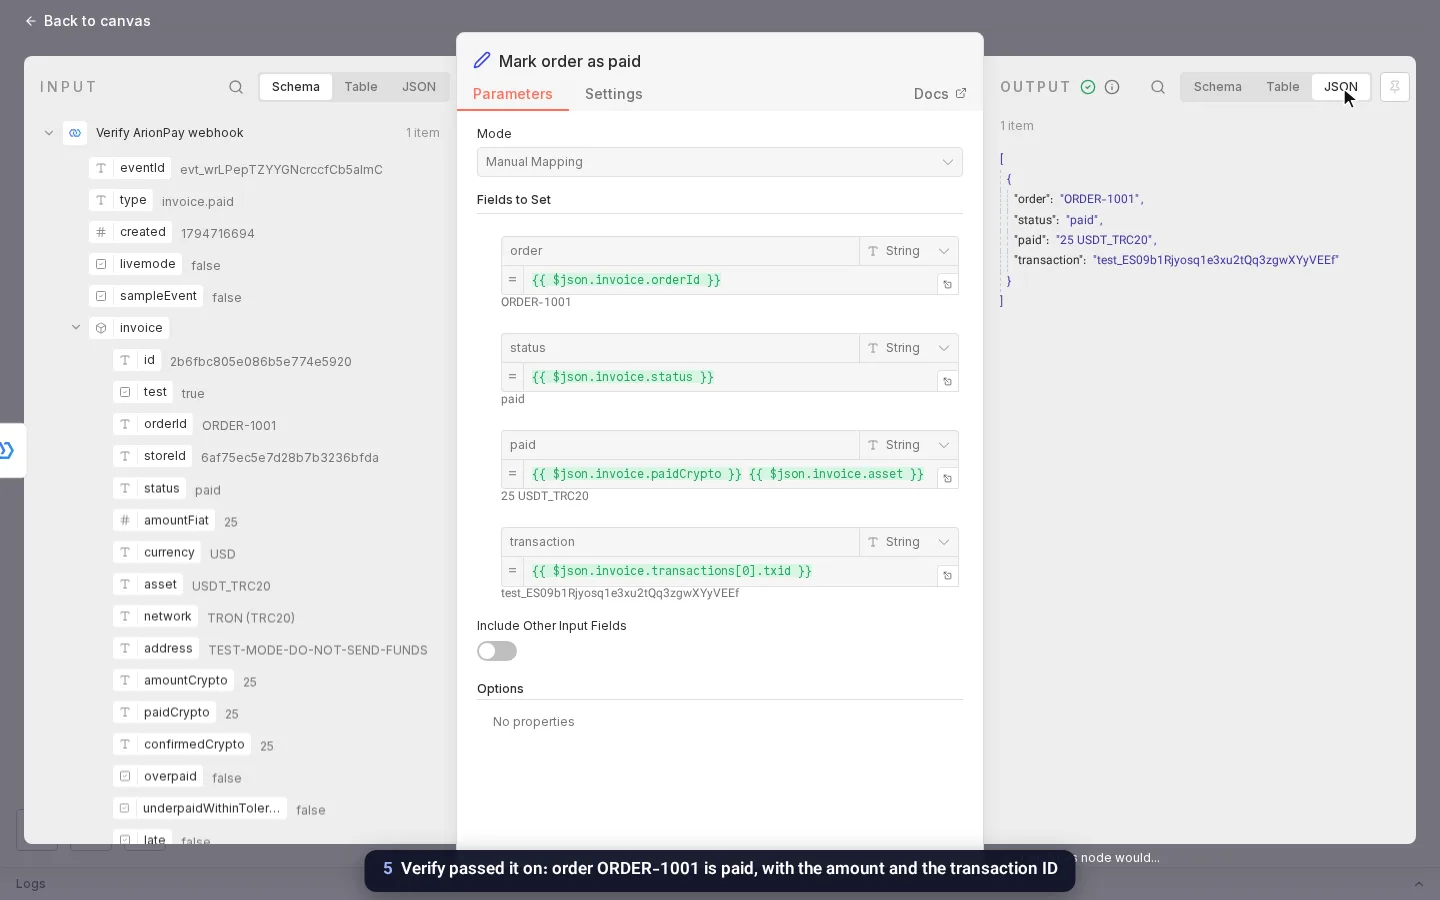
ArionPay signs an invoice.paid update and sends it to your workflow. Verify Webhook checks it and passes it on once, even if ArionPay delivers it again.
Your next step finds everything it needs: invoice.orderId for the order, invoice.amountFiat and invoice.currency for what was paid, invoice.paidCrypto and invoice.asset for the coin, and invoice.transactions[0].txid for the blockchain transaction. In the video, a Set node marks order ORDER-1001 as paid.
- 6
A forged webhook is refused
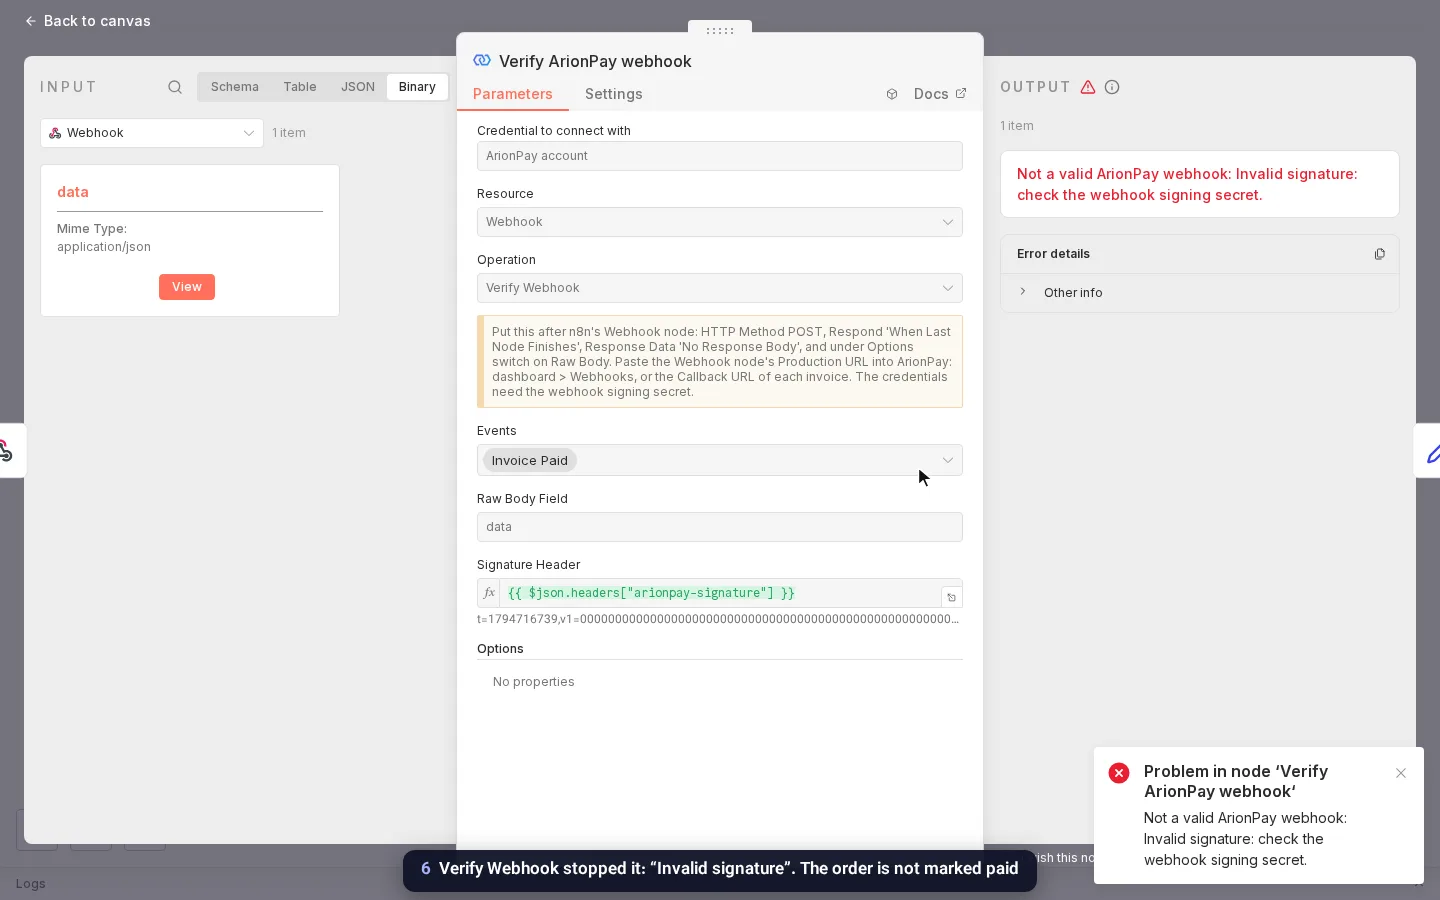
Your webhook address is public, so anyone can post a made-up "invoice.paid" to it. Verify Webhook checks the HMAC signature over the exact body with your signing secret, and the time stamp.
In the video, a forged update with a wrong signature stops at Verify Webhook with "Invalid signature". The steps after it never run, and the order is not marked paid.
After the setup
How payment updates arrive
- Invoice Paid means fully paid and confirmed. That includes late payments, small differences inside your store’s payment tolerance (default 1%), and payments you accepted in Payment Radar.
- A payment that is not exact never arrives as paid until you decide in the dashboard.
- An update that fails the check (wrong signing secret, wrong or old signature) fails the workflow, so ArionPay sends it again later, for about 3 days.
- Events you did not pick end the workflow quietly with a 200 answer.
- "Send test webhook" events from the dashboard describe a made-up invoice and are skipped unless you switch them on.
- Before you deliver, check invoice.amountFiat and invoice.currency, and that invoice.test is false for real sales.
Why ArionPay
What you get
Paid to your own wallet
Customers pay straight to your wallet. ArionPay never holds the money, so there is no balance to withdraw.
Signed updates, checked for you
Verify Webhook checks every payment update and passes each event on once. Forged or replayed requests stop there.
Test mode first
Build and try the whole workflow with test invoices and pretend payments, then switch to real ones.
Any next step
Email the customer, add a row to a sheet, give access or post to a chat: anything n8n can do. ArionPay charges 0.5% per payment.
The node is open source (MIT). Source on GitHub Download the video (6.6 MB)
16 coins and tokens on 9 networks
All coins- BTCBitcoin
- ETHEthereum
- USDTEthereum
- USDCEthereum
- BNBBNB Smart Chain
- USDTBNB Smart Chain
- USDCBNB Smart Chain
- POLPolygon
- USDTPolygon
- USDCPolygon
- TRXTRON
- USDTTRON
- LTCLitecoin
- DOGEDogecoin
- BCHBitcoin Cash
- DASHDash
Questions about n8n and ArionPay
n8n Cloud, testing, coins and cost.